All posts by felix

Get your speech recognized with Whisper

OpenAI published new speech recognition models that are very easy to use and work in many languages trained on 680,000 hours of multilingual and multitask supervised data collected from the web.

In my case all I had to do to recognize some German test:

# create a virtual environment
virtualenv venv
# activate it
. venv/bin/activate
# install whisper
pip install git+https://github.com/openai/whisper.git
# run the test
whisper test.wav --language German

And my file got recognized correctly, though it took a very long time: for the tiny model speed = x32, i.e. 32 times the time of the speech file duration, was announced

Nkululeko: How to evaluate a test set with a given best model

Nululeko has two modules for testing and unknown data set, despite train and development/evaluation set.

Let's recap the concept of train/dev/test splits:

  • train is used to train a supervised model
  • dev is a set to evaluate this model, i.e. know when it is a good model (that doesn't overfit)
  • test is a set to be used ONLY once: for the real use of the model. If you would use the test as a dev set, you can't be sure if you're not overfitting again (because you used the dev set to adjust the meta parameters of your model).

So, in order to evaluate a third dataset ( beneath train and dev) you might have situations:
a) you have a labeled test set and want to evaluate it
b) you have an unknown test set (no labels) and want to add predictions (without evaluation)

For a),
you can use the test module, and set a tests entry in the configuration [DATA] section like so:

[DATA]
tests = ['my_testdb']
my_testdb = /mypath/my_testdb
my_testdb.split_strategy = test
...

and then call Nkululeko's test module

python -m nkululeko.test --config mycoonfg.ini --outfile myresults.csv

For b),
you can use the demo module and state your test set as a list of files like so:

python -m nkululeko.demo --config my_config.ini --list my_testsamples.csv --outfile my_results.csv

In order to use a model, of course you do need to have it trained and saved before. So you need a run with the nkululeko module before.

python -m nkululeko.nkululeko --config my_config.ini

with my_config,ini containing:

[EXP]
save = True
[MODEL]
save = True

Use python for image generation

Here are some suggestions to visualize your results with python.
The idea is mainly to put your data in a pandas dataframe and then use pandas methods to plot it.

Bar plots

Here's the simple one with one variable:

vals = {'24 layers':9.37, '6 layers teached':9.94, '6 layers':10.20, 'human':10.34}
df_plot = pd.DataFrame(vals, index=[0])
ax = df_plot.plot(kind='bar')
ax.set_ylim(8, 12)
ax.set_title('error in MAE')

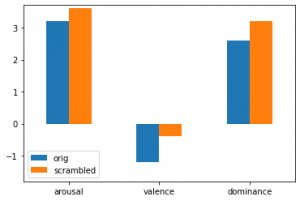
Here's an example for a barplot with two variables and three features:

vals_arou  = [3.2, 3.6]
vals_val  = [-1.2, -0.4]
vals_dom  = [2.6, 3.2]
cols = ['orig','scrambled']
plot = pd.DataFrame(columns = cols)
plot.loc['arousal'] = vals_arou
plot.loc['valence'] = vals_val
plot.loc['dominance'] = vals_dom
ax = plot.plot(kind='bar', rot=0)
ax.set_ylim(-1.8, 3.7)
# this displays the actual values
for container in ax.containers:
    ax.bar_label(container)
Stacked barplots

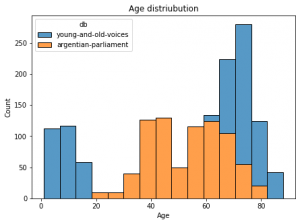
Here's an example using seaborn package for stacked barplots:
For a pandas dataframe with columns age in years and db for two database names:

import seaborn as sns
f = plt.figure(figsize=(7,5))
ax = f.add_subplot(1,1,1)
sns.histplot(data=df, ax = ax, stat="count", multiple="stack",
             x="duration", kde=False,
              hue="db",
             element="bars", legend=True)
ax.set_title("Age distriubution")
ax.set_xlabel("Age")
ax.set_ylabel("Count")
Box plots

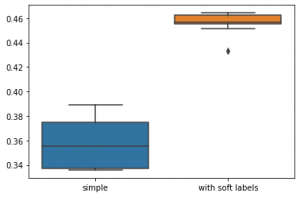
Here's a code comparing two box plots with data dots

import seaborn as sns
import pandas as pd
n = [0.375, 0.389, 0.38, 0.346, 0.373, 0.335, 0.337, 0.363, 0.338, 0.339]
e = [0.433 0.451, 0.462, 0.464, 0.455, 0.456, 0.464, 0.461 0.457, 0.456]
data = pd.DataFrame({'simple':n, 'with soft labels':e})
sns.boxplot(data = data)
sns.swarmplot(data=data, color='.25', size=1)
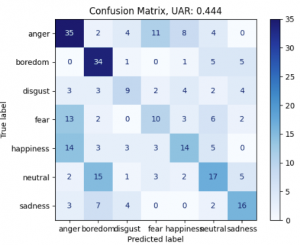
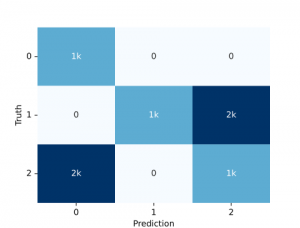
Confusion matrix

We can simply use the audplot package

from audplot import confusion_matrix

truth = [0, 1, 1, 1, 2, 2, 2] * 1000
prediction = [0, 1, 2, 2, 0, 0, 2] * 1000
confusion_matrix(truth, prediction)
Pie plot

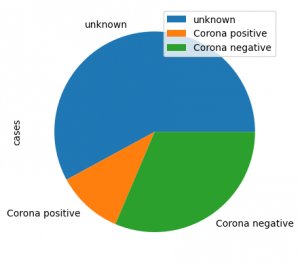
Here is an example for a pie plot

import pandas as pd

label=lst:code_fig_pie]
import pandas as pd
plot_df = 
    pd.DataFrame({'cases':[461, 85, 250]}, 
    index=['unknown', 'Corona positive', 
    'Corona negative'])
plot_df.plot(kind='pie', y='cases', autopct='%.2f')

looks like this:
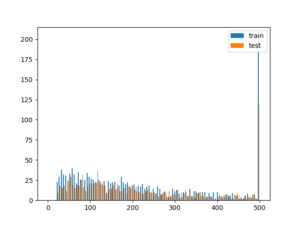
Histogram

import matplotlib.pyplot as plt
# assuming you have two dataframes with a speaker column, you could plot the histogram of samples per speaker like this 
test = df_test.speaker.value_counts()[df_test.speaker.value_counts()>0]
train = df_train.speaker.value_counts()[df_train.speaker.value_counts()>0]

plt.hist([train, test], bins = np.linspace(0, 500, 100), label=['train', 'test'])
plt.legend(loc='upper right')
# better use EPS for publication as it's vector graphics (and scales)
plt.savefig('sample_dist.eps')
How to use Latex for your project documentation

Using a documentation system that separates content and presentation has many advantages, the biggest one probably flexibility.
I vote for latex and since there is now a company that offers free latex environment, you don't have to set it up yourself (you still can, but it might be tedious).

I've set up a sample project that you should be able to copy and use as a start here:

Overleaf sample project

How to speech synthesize in German with ESPnet

Here is how to text to speech (TTS) synthesize with a German single female speaker Tacotron2 model and esp2 net

You need the python packages

pip install torch espnet_model_zoo phonemizer

Then you can run

import soundfile
from espnet2.bin.tts_inference import Text2Speech

model = 'https://zenodo.org/record/5150957/files/tts_train_tacotron2_raw_hokuspokus_phn_espeak_ng_german_train.loss.ave.zip?download=1'
text2speech = Text2Speech.from_pretrained(model)

speech = text2speech("Wow, das war ja einfach!")["wav"]
soundfile.write("out.wav", speech.numpy(), text2speech.fs, "PCM_16")

How to segment and label a speech database

Segmenting means in this case: splitting a longer audio file based on speech pauses.

This post shows you how to record, segment and then label a speech recording using the Ina speech segmenter and Labeltool.

Record audio

Firstly you need a recording. You might do that with your mobile phone or a microphone connected to your computer using, for example, Audacity.

I'd recommend recording / changing the sample rate to 16 kHz, as this is sufficient for speech recordings.

Let's say you stored your recording in the file longer_test.wav inside a directory named utterances.

Segment the recording

We start doing the segmentation in a python script.
You need some packages installed: pandas, inaSpeechSegmenter and audformat

# we start with the imports
import pandas as pd
from inaSpeechSegmenter import Segmenter
from inaSpeechSegmenter.export_funcs import seg2csv, seg2textgrid
from audformat.utils import to_filewise_index
from audformat import segmented_index

# we then use variables for our recording:
root =  './utterance/'
media = 'longer_test.wav'

# the INA speech segmenter is used very easy:
seg = Segmenter()
segmentation = seg(root+media)

# if curious, try:
print(segmentation)

# then collect the segments that were recognized as human, either female or male:
files, starts, ends = [], [], []
for entry in segmentation:
    kind = entry[0]
    start = entry[1]
    end = entry[2]
    if kind == 'female' or kind == 'male':
        print (f'{media}, {start}, {end}')
        files.append(media)
        starts.append(start)
        ends.append(end)
seg_index = segmented_index(files, starts, ends)

#  this index can now be used by audformat to acutally cut the audio file into segments
df = pd.DataFrame(index = seg_index)
file_list = to_filewise_index(df , root, 'audio_out', progress_bar = True)

# the resulting list can be stored to disk:
file_list.to_csv('file_list.csv', header=False)

Label the recording

labeling means to add metadata to the samples, for example emotional arousal.
There are hundreds of tools to do this, I use of course the one i programmed myself, Speechalyzer 😉
Here's a tutorial how to set this up and how to adapt the tool

If running on linux, you could then start the Speechalyzer with the file list you created like this:

java -jar ~/research/Speechalyzer/Speechalyzer.jar -cf ~/research/Speechalyzer/res/speechalyzer.properties -fl file_list.csv

and then simply start the Labeltool to label the files.

Speechalyzer can then export the labels to a file which can be used by Nkululeko as a labeled speech database in CSV format.

Nkululeko FAQ

This post is the start of a troubleshooting /FAQ list

The number of speakers in my test/train splits seems wrong

  • Did you check if perhaps the speakers from several datasets are the same? If so, you can add a dataname.rename_speakers = True to the configuration. This will prepend the dataset name to the speakers

How to combine feature sets with Nkululeko

If you want to use combine several acoustic parameter (feature) sets with nkululeko, you might state

[FEATS]
type = ['mld', 'praat']
features = ['JitterPCA', 'meanF0Hz', 'hld_sylRate']

This would combine the

  • hld_sylRate feature from MLD
  • JitterPCA feature from Feinberg's Praat features and
  • meansF0Hz feature from Feinberg's Praat features

Of course you could omit the features entry and simply use all of them.

It's interesting to see how many emotions from Berlin Emodb can still be recognized with only these three parameters:

How to use selected features from Praat with Nkululeko

If you want to use acoustic parameters extracted by the wonderful Praat software with nkululeko, you state

[FEATS]
type=['praat']

in the feature section of your config file.
If you like to use only some features of all the ones that are extracted by David R. Feinberg's Praat scripts, you can look at the output and select some of them in the FEAT section, e.g.

type = ['praat']
praat.features = ['speechrate(nsyll / dur)']

You can do the same with opensmile features:

type = ['os']
os.features = ['F0semitoneFrom27.5Hz_sma3nz_amean']

or even combine them

type = ['praat', 'os']
praat.features = ['speechrate(nsyll / dur)']
os.features = ['F0semitoneFrom27.5Hz_sma3nz_amean']

this is actually the same as

type = ['praat', 'os']
features = ['speechrate(nsyll / dur)', 'F0semitoneFrom27.5Hz_sma3nz_amean']

if you would want to combine all of opensmile eGeMAPS features with selected Praat features, you would do:

type = ['praat', 'os']
praat.features = ['speechrate(nsyll / dur)']

It is interesting to see, how many emotions of Berlin EmoDB still get recognized with only mean F0 and Jitter as features:

image

What kind of features are there, you might ask yoursel?
Here's a list:
'duration', 'meanF0Hz', 'stdevF0Hz', 'HNR', 'localJitter',
'localabsoluteJitter', 'rapJitter', 'ppq5Jitter', 'ddpJitter',
'localShimmer', 'localdbShimmer', 'apq3Shimmer', 'apq5Shimmer',
'apq11Shimmer', 'ddaShimmer', 'f1_mean', 'f2_mean', 'f3_mean',
'f4_mean', 'f1_median', 'f2_median', 'f3_median', 'f4_median',
'JitterPCA', 'ShimmerPCA', 'pF', 'fdisp', 'avgFormant', 'mff',
'fitch_vtl', 'delta_f', 'vtl_delta_f''

How to test a trained model on a new test set with Nkululeko

Sometimes you might want to test your already trained model(s) on a new dataset, e.g. because the training took a lot of resources.
If you stored your models during the training this is possible.

[DATA]
databases = ['emodb']
....
[MODEL]
save = True

In a new config file for your experiment that uses a dufferent test set, you set

[DATA]
databases = ['emodb', 'polish']
trains = ['emodb']
tests = ['polish']
strategy = cross_data....
[MODEL]
only_test = True

In the example above, emodb has been used as the training database, and polish in a second experiment later as a test database.