Category Archives: tutorial

Nkululeko: how to visualize your data distribution

If you just want to see how your data distributes on the target and speaker gender, you can do a value_counts plot with the explore module

In your config, you would specify like this:

[EXPL]
# all samples, or only test or train split?
sample_selection = all 
# activate the plot
value_counts = True

and then, run this with the explore module:

python -m nkululeko.explore --config myconfig.ini

The result looks similar to this:

Nkululeko: how to augment the training set

To do data augmentation with Nkululeko, you can use the augment interface.
In the DATA section of your configuration file, you specify the name of the output list of files like so

[DATA]
augment = my_augmentations.csv

and then call the interface:

python - nkululeko.augment --config myconfig.ini

Currently, Nkululeko simply uses the augmentations that are specified as a demo in the audiomentations documentation, i.e.:

self.audioment = Compose([
    AddGaussianNoise(min_amplitude=0.001, max_amplitude=0.015, p=0.5),
    TimeStretch(min_rate=0.8, max_rate=1.25, p=0.5),
    PitchShift(min_semitones=-4, max_semitones=4, p=0.5),
    Shift(min_fraction=-0.5, max_fraction=0.5, p=0.5),
])

These manipulations are applied randomly to your training set.

You should find the augmented files in the storage folder of the result folder of your experiment and could listen to them there.

Once you augmentations have been processed, you can add them to the training in a new experiment:

[DATA]
databases = ['original data', 'augment']
augment = my_augmentations.csv
augment.type = csv
augment.absolute_path = True
augment.split_strategy = train

Nkululeko: show feature importance

Since version 0.40, Nkululeko can now show the best performing X acoustic features according to some model.

There is a new section call EXPL (short for exploration), and you could state

[EXPL]
model = tree
sample_num = 15

in your config file, and then run the exploration module like this:

python -m nkululeko.explore --config my_config.ini

The resulting list will then appear in the result folder and a barplot image in the image folder.

Nkululeko: how to plot distributions of feature values

As shown in this post, with Nkululeko you can select only specific features from your features sets by specifying them in the [FEAT] section:

[FEATS]
features = ['JitterPCA', 'meanF0Hz', 'hld_sylRate']

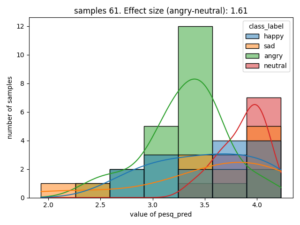
What you can also do, is plotting them per category (only for classification), by specifying in the PLOT section if you would like that for all samples or only test or train samples:

[EXPL]
# turn it on
feature_distributions = True 
# use only training samples
sample_selection = train 
# only plot the 5 most important features 
max_feats = 5  

You would have to call nkululeko with the explore interface:

python -m nkululeko.explore --config <myConfig.ini>

The image file is in the image folder and should look similar to this:

Nkululeko: how to predict many samples

There are three ways to predict a number of samples:

  1. If you want to save the predictions of an experiment for later use, you can do so by stating in the EXP section

    [EXP]
    save_test = ./my_saved_test_predictions.csv

    The output format is CSV, comma seperated values.

  2. Alternatively, you can test an existing database against the best model you trained before, by stating the databases as tests in the DATA section:

    [DATA]
    tests = ['my_testdb']
    my_testdb = /mypath/my_testdb
    ...

    and then calling Nkululeko's test module

    python -m nkululeko.test --config mycoonfg.ini --outfile myresults.csv
  3. Run the demo module simply for a set of files:

    python -m nkululeko.demo --config mycoonfg.ini --list my_filelist.txt

Transformation architectures

Generally a difference for machine learners can be made by the nature of input and output.


source

One to one

Typically an application would be to classify the main motive of a picture (e.g. cat or dog) or the emotional category that is displayed in an audio recording. Key is, that the input is represented by a single vector of values of fixed length.

One to many

Many to one

Sequence to sequence

Many to many

How to import features from outside the Nkululeko software

Since version 0.29.1 there is the possibilty to directly import acoustic features into the Nkululeko framework.

You can specify a file to be imported in the FEATS section:

[FEATS]
type = ['import']
import_file = /home/.../my_features.csv

Of course the features still can be combined with other feature sets and will be assigned to training and test splits accordingly.

The feature file must be in CSV format (comma separated values) in audformat with segmented index.
Here is an example:

file,start,end,voice segments,HNR Mean (dB),F1 Mean (Hz)
/home/.../a42_1.wav,0 days,0 days 00:00:07.815875,4.13,45,7.48,

Predict emotional states with the audEERING model

audEERING recently published an emotion prediction model based on a finetuned Wav2vec2 transformer model.

Here I'd like to show you how you can use this model to predict your audio samples (it is actually also explained in the Github link above).

As usual, you should start with dedicating a folder on your harddisk for this and install a virtual environment:

virtualenv -p=3 venv

which means we want python version 3 (and not 2)
Don't forget to activate it!

Then you would need to install the packages that are used:

pandas
numpy
audeer
protobuf == 3.20
audonnx
jupyter
audiofile
audinterface

easiest to copy this list into a file called requierments.txt and then do

pip install -r requirements.txt

and start writing a python script that includes the packages:

import audeer
import audonnx
import numpy as np
import audiofile
import audinterface

, load the model:

# and download and load the model
url = 'https://zenodo.org/record/6221127/files/w2v2-L-robust-12.6bc4a7fd-1.1.0.zip'
cache_root = audeer.mkdir('cache')
model_root = audeer.mkdir('model')

archive_path = audeer.download_url(url, cache_root, verbose=True)
audeer.extract_archive(archive_path, model_root)
model = audonnx.load(model_root)

sampling_rate = 16000
signal = np.random.normal(size=sampling_rate).astype(np.float32)

load a test sentence (in 16kHz 16 bit wav format)

# read in a wave file for testing
signal, sampling_rate = audiofile.read('test.wav')

and print out the results

# print the results in the order arousal, dominance, valence.
print(model(signal, sampling_rate)['logits'].flatten())

You can also use audinterace's magic and process a whole list of files like this:

# define the interface
interface = audinterface.Feature(
    model.labels('logits'),
    process_func=model,
    process_func_args={
        'outputs': 'logits',
    },
    sampling_rate=sampling_rate,
    resample=True,    
    verbose=True,
)
# create a list of audio files
files = ['test.wav']
# and process it
interface.process_files(files).round(2)

should result in:

Also check out this great jupyter notebook from audEERING

Get your speech recognized with Whisper

OpenAI published new speech recognition models that are very easy to use and work in many languages trained on 680,000 hours of multilingual and multitask supervised data collected from the web.

In my case all I had to do to recognize some German test:

# create a virtual environment
virtualenv venv
# activate it
. venv/bin/activate
# install whisper
pip install git+https://github.com/openai/whisper.git
# run the test
whisper test.wav --language German

And my file got recognized correctly, though it took a very long time: for the tiny model speed = x32, i.e. 32 times the time of the speech file duration, was announced