Tag Archives: python

How to set up your first nkululeko project

Nkululeko is a framework to build machine learning models that recognize speaker characteristics on a very high level of abstraction (i.e. starting without programming experience).

This post is meant to help you with setting up your first experiment, based on the Berlin Emodb.

1) Set up python

It's written in python so first you have to set up a Python environment

2) Get a database

Load the Berlin emodb database to some location on you harddrive, as discussed in this post. I will refer to the location as "emodb root" from now on.

3) Install nkululeko

Inside your virtual environment, run

pip install nkululeko

This should install nkululeko and all required modules.
It takes a long time and a lot of space, when done intially.

5) Adapt the ini file

Use your favourite editor, e.g. visual studio code and edit the file that defines your experiment. You might start with this demo sample.
You can find more templates to start here and an overview on all the options you can set here

Put the emodb root folder as the emodb value, for me this looks like this

emodb = /home/felix/data/audb/emodb

An overview on all nkululeko options should be here

6) Run the experiment

Inside a shell type (or use VSC) and start the process with

python -m nkululeko.nkululeko --config exp_emodb.ini

7) Inspect the results

If all goes well, the program should start by extracting opensmile features, and, if you're done, you should be able to inspect the results in the folder named like the experiment: exp_emodb.
There should be a subfolder with a confusion matrix named images` and a subfolder for the textual results named `results.

What to do next?

You might be interested in the hello world of nkululeko

.

Machine learning experiment framework

Currently i'm working on (yet another) framework for machine learning, i.e. a python coded set of classes that can be used to run machine learning experiments in a flexible but reusable way.

I'm not sure where this is heading yet, but a first runnable version exists, if interested check it out at my github account, I'll update news there.

The general idea looks something like this:

How to set up a python project

These are some general best practise tips how to organize your seminar project.

Optional: Set up a git account

git is a software that safes your work on the internet so you can always go back to earlier versions if something goes wrong. A bit like a backup system, but also great for collaborative work.

  • install the "git" software on your computer
  • go to github.com (or try gitlab.org) and get yourself an account.
  • make there a new repository, and name it e.g. my-sample-project
  • if it's a Python project, select the pathon template for the .gitignore file (this will ignore typical python temporary files for upload).
  • go to the main repository page, open the "code" dropdown button and cope the "clone" URL.
  • On your computer in a shell/terminal/console, go where your project should reside (I strongly encourage to use a path without whitespace in it) and type
    git clone <URL>

    and the project folder should be created and is linked with the git repository.

  • learn about the basic git commands by searching for a quick tutorial (git cheat sheet).

install python

  • install a python version, use version >= 3.6

this depends a lot on your operating system.
For Mac and windows it might be enough to type python in your application search and then follow the instructions for installation, if not already installed.

set up a virtual environment

  • creat a project folder
  • enter your project folder,
    cd my-sample-project
  • create a virtual environment that will contain all the python packages that you use in your project:
    virtualenv -p python3 my-project_env

    If virtualenv is not installed, you can either install it or create the environment with

    python3 -m venv my-project_env
  • then activate the environment
    ./my-project_env/bin/activate

    (might be different for other operating systems)

  • you should recognize the activated environment by it's name in brackets preceding the prompt, e.g. something like
    (my-project_env) user@system:/bla/path/$

Get yourself a python IDE

IDE means 'integrated desktop environment' and is something like a very comfortable editor for python source files. If you already know and use one of the many, I wouldn't know a reason to switch. If not, I'd suggest you take a look at VSC, the visual studio code editor as it's free of costs, available on many platforms and can be extended with many available plugins.

I've made a screencast (in German) on how to install python and jupyter notebooks on Windows

How to extract formant center frequencies (or other acoustic features) from speech data with opensmile in python

There is a framework called OpenSMILE published on Github that can be used to extract high level acoustic features from audio signals and I’d like to show you how to use it with Python.

I’ve set up a notebook for this here.

First you need to install opensmile.

pip install opensmile

General procedure

There are two ways to extract a specific acoustic feature with opensmile:

1) Use an existing config that contains your target feature and filter it from the results
2) Write your own config file and extract only your target feature directly

Method 1 is easier but obviously not resource efficient, 2 is better but then to learn the opensmile config syntax and all the existing modules is not trivial.

Using one example for an acoustic feature: formants, we’ll do both ways. The documentation for the python wrapper of opensmile is here

The following assumes you got a test wave file recorded and stored somewhere:

testfp = '/kaggle/input/testdata/testsatz.wav'
IPython.display.Audio(testfp)

Method 1): Use an existing config file that includes the first three formant frequencies

We start with instantiating the main extractor class, Smile, with a configuration that includes formants. The GeMAPSv01b features set has been derived from the GeMAPS feature set

smile = opensmile.Smile(
feature_set=opensmile.FeatureSet.GeMAPSv01b,
feature_level=opensmile.FeatureLevel.LowLevelDescriptors,
)

Extract this for our test sentence, out comes a pandas dataframe

result_df = smile.process_file(testfp)
print(result_df.shape)

Now use only the three center formant frequencies

centerformantfreqs = [‘F1frequency_sma3nz’, ‘F2frequency_sma3nz’, ‘F3frequency_sma3nz’]
formant_df = result_df[centerformantfreqs]
formant_df.head()

This should be your ouput: per frame three values: the center frequencies of the formants:

.

Method 2): Write your own config file

The documentation for opensmile config files is here.
Most often it is probably easier to look at an existing config file and copy/paste the components you need.

You could edit the opensmile config in a string:

formant_conf_str = '''
[componentInstances:cComponentManager]
instance[dataMemory].type=cDataMemory

;;; default source
[componentInstances:cComponentManager]
instance[dataMemory].type=cDataMemory

;;; source

\{\cm[source{?}:include external source]}

;;; main section

[componentInstances:cComponentManager]
instance[framer].type = cFramer
instance[win].type = cWindower
instance[fft].type = cTransformFFT
instance[resamp].type = cSpecResample
instance[lpc].type = cLpc
instance[formant].type = cFormantLpc

[framer:cFramer]
reader.dmLevel = wave
writer.dmLevel = frames
copyInputName = 1
frameMode = fixed
frameSize = 0.025000
frameStep = 0.010000
frameCenterSpecial = left
noPostEOIprocessing = 1

[win:cWindower]
reader.dmLevel=frames
writer.dmLevel=win
winFunc=gauss
gain=1.0

[fft:cTransformFFT]
reader.dmLevel=win
writer.dmLevel=fft

[resamp:cSpecResample]
reader.dmLevel=fft
writer.dmLevel=outpR
targetFs = 11000

[lpc:cLpc]
reader.dmLevel=outpR
writer.dmLevel=lpc
p=11
method=acf
lpGain=1
saveLPCoeff=1
residual=0
forwardFilter=0
lpSpectrum=0
lpSpecBins=128

[formant:cFormantLpc]
reader.dmLevel=lpc
writer.dmLevel=formant
saveIntensity=1
saveBandwidths=0
maxF=5500.0
minF=50.0
nFormants=3
useLpSpec=0
medianFilter=0
octaveCorrection=0

;;; sink

\{\cm[sink{?}:include external sink]}
'''

which you can save as a config file:

with open('formant.conf', 'w') as fp:
    fp.write(formant_conf_str)

Now we reinstantiate our smile object with the custom config

smile = opensmile.Smile(
    feature_set=’formant.conf’,
    feature_level=’formant’,
)

and extract again

formant_df_2 = smile.process_file(testfp)
formant_df_2.head()

Voila! The output is should be similar to the one you got with the first method.

Machine classification of emotional speech with EmoDB and python

This is a tutorial on how to

  • configure a python environment with Jupyter notebook
  • download Berlin EmoDB
  • import the audformat database
  • extract acoustic features with opensmile
  • perform a machine classification with sklearn

It does expect some experience with

  • unix commands
  • python
  • pandas

So if you miss this you might have to google the stuff you don't understand.
In case you know German and use Windows I recorded this screencast for you.

There is a Kaggle notebook that you could use to try this out.

Configure a python environment

I start from the point where you got python installed on your machine and have a shell (console window).
I use Unix commands here, most of them should also work on Mac OS, for Windows you might have to adapt some (e.g. 'ls' becomes 'dir').

So if you type 

python3 

in your shell, the python interpreter should start, you can quit it with the command 

exit()

Create a subfolder for your project and enter it, e.g.

mkdir emodb; cd emodb

Create a virtual environment for your project

python3 -m venv ./venv 

Activate your project

source ./venv/bin/activate

which should result in your prompt including the environment name like e.g. this

(venv)>

You can leave your environment with the

deactivate

command. For now though, please make sure you have the environment activated. You can then install the most important packages with pip like this:

pip install pandas numpy jupyter audformat opensmile sklearn matplotlib

If all goes well, you should now be able to start up the jupyter server which should give you an interface in your browser window.

jupyter notebook &

And create a new notebook by clicking the "New" button near the left top corner.

Get and unpack the Berlin Emodb emotional database

You would start by downloading and unpacking emodb like this (of course you can do this as well outside the notebook in your shell):

!wget -c https://tubcloud.tu-berlin.de/s/8Td8kf8NXpD9aKM/download
!mv download emodb_audformat.zip
!unzip emodb_audformat.zip
!rm emodb_audformat.zip

with

import audformat
db = audformat.Database.load('./emodb')
db

you can load the database and inspect the contents.

You still have to state the absolute path to the audio files for further processing. You would find the current directory with the

!pwd

command, and would add the emodb folder name to it and prefix this to the wav file paths like so

import os
root = '/...my current directory.../emodb/'
db.map_files(lambda x: os.path.join(root, x))

To check that this worked you might want to listen to a sample file

import IPython
IPython.display.Audio(db.tables['emotion'].df.index[0])

which should give you a GUi like this

Extract acoustic features

EmoDB is annotated with emotional labels. If we want to classify these emotions automatically we need to extract acoustic features first.

We can do this easily in python with dedicated packages for this like the Praat software or opensmile. In this tutorial we'll use opensmile.

First we will get the Pandas dataframes from the database like this:

df_emo = db.tables['emotion'].df
df_files = db.tables['files'].df

and might want to inspect the class distribution with pandas

df.emotion.value_counts().plot(kind='pie')

then, with

import opensmile
smile = opensmile.Smile(
    feature_set=opensmile.FeatureSet.GeMAPSv01b,
    feature_level=opensmile.FeatureLevel.Functionals,
)

you construct your feature extractor and with

df_feats = smile.process_files(df_emo.index)

should be able to extract the 62 GeMAPS acoustic features, which you could check by looking at the dimension of the dataframe

df_feats.shape

and looking at the first entry

df_feats.head(n=1)

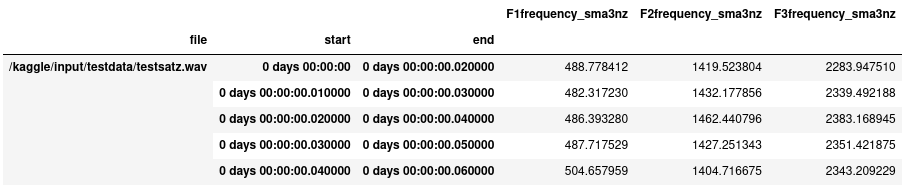
You might run into trouble later because the smile.process function per default results in a multiindex with filename, start and end time (because you might have extracted low level features per frame). In the following picture i show my screen so far to illustrate the situation.

So you end up with three data frames:

  • df_emo with emotion labels and confidence
  • df_files with duration, speaker id and transcript index
  • df_feats with the features
    So in order to be able to match the indeces from this three dataframes, I dropped the start and end columns from the features dataframe with the following lines:

    df_feats.index = df_feats.index.droplevel(1) # drop start level
    df_feats.index = df_feats.index.droplevel(1) # drop end level

Perform a statistical classification on the data

Now we would conclude this tutorial by performing a first machine classification.
You basically need four sets of data for this: each a feature and label set for a training and a test (or better: development) set.

In a naive approach, we use the first 100 entries of the EmoDB for test and the others for training:

test_labels = df_emo.iloc[:100,].emotion
train_labels = df_emo.iloc[100:,].emotion
test_feats = df_feats.iloc[:100,]
train_feats =  df_feats.iloc[100:,]

There are numerous possibilities to use machine classifiers in python, if we don't want to code one ourselves we might want to use on from the sklearn package, for example an implementation of the SVM (support vector machine) algorithm

from sklearn import svm
clf = svm.SVC()

train it with our training features and labels

clf.fit(train_feats, train_labels)

, compute predictions on the test features

pred_labels  = clf.predict(test_feats)

and compare the predictions with the real labels (aka ''ground truth'') with a confusion matrix

from sklearn.metrics import confusion_matrix
confusion_matrix(test_labels.emotion, pred_labels)

and by computing the unweighted average recall (UAR)

from sklearn.metrics import recall_score
recall_score(test_labels, pred_labels, average='macro')

This results in chance level as the SVM classifier lazily always decided on the majority class. The results can be improved to something more meaningful, e.g. by passing better meta parameters when constructing the classifier:

clf = svm.SVC(kernel='linear', C=.001)

and repeating the experiment, which should result in a confusion matrix like this one (see Kaggle notebook for code):

.

This concludes the tutorial so far, what to do next?

Here are some suggestions:

  • What is really problematic with the above approach is that the training and the test set are not speaker independent, i.e. the same 10 speakers appear in both sets.
    • Which means you can not know if the classifier learned anything about emotions or (more probable) some idiosyncratic peculiarities of the speakers.
    • With so few speakers it doesn't make a lot of sense to further divide them, so what people often do is perform a LOSO (leave-one-speaker-out) or do x-cross validation by testing x times a part of the speakers against the others (in the case of EmoDB this would be the same if x=10).
  • What's also problematic is that you only looked at one (very small, highly artificial) database and this usually does not result in a usable model for human emotional behavior.
    • Try to import a different database or record your own, map the emotions to the EmoDB set and see how this performs.
  • SVMs are great, but you might want to try other classifiers.
    • Perform a grid search on the best meta-parameters for the SVM.
    • Try other sklearn classifiers.
    • Try other famous classifiers like e.g. XGBoost.
    • Try ANNs (artificial neural nets) with keras or torch.
  • Try other features
    • There are other opensmile feature set configurations available.
    • Do feature selection and to identify the best ones to see if they make sense.
    • Try other features, e.g. from Praat or other packages.
    • Try embeddings from pretrained ANNs like e.g. Trill or PANN features.
  • The opensmile features are all given as absolute values.
    • Try to normalize them with respect to the training set or each speaker individually.
  • Generalization is often improved by adding acoustic conditions to the training:
    • Try augmenting the data by adding samples mixed with noise or bandpass filters.
  • Last not least: code an interface that lets you test the classifier on the spot.